
Saturday, March 4, 2023
Zipper Pouches

Friday, April 17, 2020
Viral Masks
Right away I'm gonna apologize for the sloppiness of this post. The pictures are not color corrected, cropped or watermarked. The text will be fast and perhaps have errors. The reason for this is I have been asked to share how I make masks to help limit the spread of the COVID-19 virus and I slapped this post together fast. Maybe one day I'll come back and clean this up, but for now you have my apologies.

The CDC is now recommending face masks be worn:
There are alot of mask tutorials going around out there. I'll admit, I hesitated a long time before jumping into the fray mostly because I wanted to find the right pattern. If I made masks to donate, I wanted to make sure they were useful. The tutorial I found was distrubuted by my local hospital on exactaly what they needed for home sewers. For a copy of the directions I used click HERE. This is what I call fast and dirty stitching. I pin very little and I don't bother with pressing seams at all. I'm lucky my dad offered to iron the material I pulled out of the washer or I might not have even done that much. Speed and Quantity is what I'm after.

What you will need:

A 8x14 template will help speed you along if you are making many masks. I'm making them for all my co-workers so the template helped me A LOT. A pizza box lid was nearly the perfect size.

Fabric cut to size. This was just a regular quarter yard, not a fat quarter, so this is the only way the template will fit. If you don't want your design to be sideways like this one will be, turn it 90 degrees. You can almost get 3 masks from a quarter yard of fabric if one is a little smaller, but only 2 from a fat quarter, but you can twist it to make your pattern right side up.

Fold in half (WARNING! I took the picture wrong. It should be RIGHT SIDES TOGETHER! Not wrong sides as is pictured above. Sorry!)
Corrected Photo below. Right sides together.


I've been using a zig zag stitch. This is fast and dirty stitching and I wanted to make sure the stitches covered all the folds I would be sandwiching together. I also haven't been bothering with any backstitching till the very end. All these seams will be covered by another seam so I'm not worried.

Long side stitched up.

Turn it inside out now so the RIGHT SIDES are now facing out.

Slip the material thru the middle tine of the fork and twist the fork so the material twists into a fold.

Smooth the fold and slip the fork out. Each pleat should be about an inch big.

Pin the pleat in place and make one mor just below it. Pin new pleat and pin the folds flat on opposite end too.

Face part of the mask should be between 3-3.5 inches wide. Too wide? Take the pleats in more. Too narrow? Pull the pleats farther apart.

Sew the ends and and pull the pins out. Trim up the excess fabric.

Cotton muslin has a wonderful feature. All you need to do is make a tiny cut the size you need. In this case my muslin is 36 inches wide and I made a tiny cut 2 inches in.

Take ahold of the fabric firmly on both sides of the cut and pull. Muslin tears in a straight line. You now have a 2 inch strip of fabric 36 inches long.

Fold the muslin in half and pin to your face mask.

Fold both raw edges of the strip to the center.

Then fold the strip in half so that the raw edges are INSIDE the tie. Before sewing it down, bend the tip up just a little bit to get the raw end sewn down too. I couldn't get a good pic of the starting fold, but 2 pictures down you can see the fold at the end. I also gave it a little backstitch.

When you get to the mask part make sure the raw ends are tucked inside and the strap is folded over the mask. You should be sewing thru ALL pieces of the mask. Your machine's feed dogs (the part that pulls the fabric thru the machine) might struggle a little thru this part so feel free to gently pull the finished strap on the other side to help the cloth get thru. Be careful not to pull hard or you might break your needle.

At the end of the strap, bend up the tip just like you did at the begining. You can also give a little backstitch on the bent up pieces if you so desire.

And here's your finished mask! It ties behind the neck and behind the head above the ears. Pull the face pleats open to cover your nose and chin.

Every instructional I write really should start with Step One: Remove cat from sewing table.

and Step 7: Remove OTHER cat from sewing table.

The Pennsylvania Department of Health has some good tips on using masks but I want to reiterate a few important ones:

Directions
The CDC is now recommending face masks be worn:
"in public settings where other social distancing measures are difficult to maintain (e.g., grocery stores and pharmacies), especially in areas of significant community-based transmission."
There are alot of mask tutorials going around out there. I'll admit, I hesitated a long time before jumping into the fray mostly because I wanted to find the right pattern. If I made masks to donate, I wanted to make sure they were useful. The tutorial I found was distrubuted by my local hospital on exactaly what they needed for home sewers. For a copy of the directions I used click HERE. This is what I call fast and dirty stitching. I pin very little and I don't bother with pressing seams at all. I'm lucky my dad offered to iron the material I pulled out of the washer or I might not have even done that much. Speed and Quantity is what I'm after.

What you will need:
- A sewing machine with thread
- Prewashed 100% cotton material
- 8"x14" piece of cardboard for a template
- Scissors (Or rotary cutter and mat. I'm out of luck. Mine busted just before quarentine and I had to make due with regular scissors)
- Pins
- Tape Measure
- Dinner Fork
- Instructions
- Something to make ties with (elastic if you can get it. I'm using cotton muslin cloth)

A 8x14 template will help speed you along if you are making many masks. I'm making them for all my co-workers so the template helped me A LOT. A pizza box lid was nearly the perfect size.

Fabric cut to size. This was just a regular quarter yard, not a fat quarter, so this is the only way the template will fit. If you don't want your design to be sideways like this one will be, turn it 90 degrees. You can almost get 3 masks from a quarter yard of fabric if one is a little smaller, but only 2 from a fat quarter, but you can twist it to make your pattern right side up.

Fold in half (WARNING! I took the picture wrong. It should be RIGHT SIDES TOGETHER! Not wrong sides as is pictured above. Sorry!)
Corrected Photo below. Right sides together.


I've been using a zig zag stitch. This is fast and dirty stitching and I wanted to make sure the stitches covered all the folds I would be sandwiching together. I also haven't been bothering with any backstitching till the very end. All these seams will be covered by another seam so I'm not worried.

Long side stitched up.

Turn it inside out now so the RIGHT SIDES are now facing out.

Slip the material thru the middle tine of the fork and twist the fork so the material twists into a fold.

Smooth the fold and slip the fork out. Each pleat should be about an inch big.

Pin the pleat in place and make one mor just below it. Pin new pleat and pin the folds flat on opposite end too.
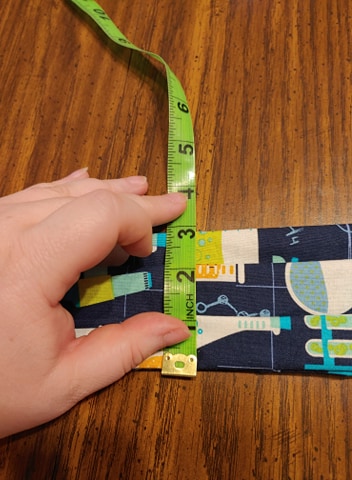
Face part of the mask should be between 3-3.5 inches wide. Too wide? Take the pleats in more. Too narrow? Pull the pleats farther apart.

Sew the ends and and pull the pins out. Trim up the excess fabric.

Cotton muslin has a wonderful feature. All you need to do is make a tiny cut the size you need. In this case my muslin is 36 inches wide and I made a tiny cut 2 inches in.

Take ahold of the fabric firmly on both sides of the cut and pull. Muslin tears in a straight line. You now have a 2 inch strip of fabric 36 inches long.

Fold the muslin in half and pin to your face mask.

Fold both raw edges of the strip to the center.

Then fold the strip in half so that the raw edges are INSIDE the tie. Before sewing it down, bend the tip up just a little bit to get the raw end sewn down too. I couldn't get a good pic of the starting fold, but 2 pictures down you can see the fold at the end. I also gave it a little backstitch.

When you get to the mask part make sure the raw ends are tucked inside and the strap is folded over the mask. You should be sewing thru ALL pieces of the mask. Your machine's feed dogs (the part that pulls the fabric thru the machine) might struggle a little thru this part so feel free to gently pull the finished strap on the other side to help the cloth get thru. Be careful not to pull hard or you might break your needle.

At the end of the strap, bend up the tip just like you did at the begining. You can also give a little backstitch on the bent up pieces if you so desire.

And here's your finished mask! It ties behind the neck and behind the head above the ears. Pull the face pleats open to cover your nose and chin.

Every instructional I write really should start with Step One: Remove cat from sewing table.

and Step 7: Remove OTHER cat from sewing table.

The Pennsylvania Department of Health has some good tips on using masks but I want to reiterate a few important ones:
- Avoid touching the mask while using it, if you do wash your hands with soap and water or alcohol-based hand rub
- Be discarded or washed after every use
- Should not be worn damp or when wet from spit or mucus
- To remove the mask: remove it from behind, do not touch the front of mask
- The wearer should immediately wash their hands with soap and water for 20 seconds after removing the mask
Thursday, August 22, 2019
Can't Stay Away For Long....
So I designed a lot of patterns. Not all got tested so not all ended up on FandomInStitches. Instead they sat in a dark corner of Google Drive, untested and unknown. Sad, I know. In my defense, most things I design I do intend to one day make myself. Maybe. Someday. Or not.
Anyway, FiS decides they want to do a Rankin and Bass Christmas Quilt A Long. And who has a couple Rankin and Bass patterns sitting dusty and unused? You got it. So FiS asked me to pull them out and get them tested. Suddenly I'm back in the quilting world after a long hiatus. So let me introduce the Miser Brothers:
Heat Miser
(tested by Jessica A, Kimberlee B and Jeanie P)

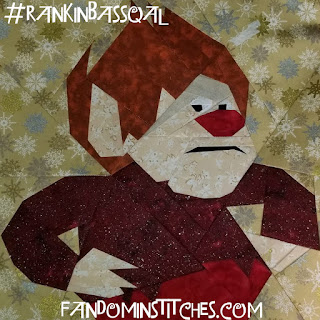

Snow Miser
(tested by Jessica A and Jeanie P)


I can finally post them now that they have gone live on the FiS website. Tweeking the patterns has gotten me designing again and if you check out my Quilt Blocks I've Designed page, you will find a lot of new patterns. Untested of course.
Anyway, FiS decides they want to do a Rankin and Bass Christmas Quilt A Long. And who has a couple Rankin and Bass patterns sitting dusty and unused? You got it. So FiS asked me to pull them out and get them tested. Suddenly I'm back in the quilting world after a long hiatus. So let me introduce the Miser Brothers:
Heat Miser
(tested by Jessica A, Kimberlee B and Jeanie P)


Snow Miser
(tested by Jessica A and Jeanie P)
I can finally post them now that they have gone live on the FiS website. Tweeking the patterns has gotten me designing again and if you check out my Quilt Blocks I've Designed page, you will find a lot of new patterns. Untested of course.
Tuesday, March 29, 2016
The X-Files Quilt Along: FBI Badge

So I'm doing a quilt along with FandomInStitches. It's an X-Files quilt. Not one of my fav fandoms, but I have a friend that would love it when its done so it's totally his. If I ever finish it. Most of the blocks are embroidered and that is not my fav type of block. So when they asked designers to make a block I had to do paper pieced. I designed it for 10x10 but after I re-read the rules I found it had to be 6x6 so I re-sized it. The problem is there is a lot of very tiny pieces. Go slowly and iron the ever-loving hell out of it.
Monday, March 14, 2016
Jar Jar Binks Quilt Block
 |
| Tested by Simon B. Photo used with permission. |
FandomInStitches is planning a Star Wars post and asked their designers to make a new Star Wars block. That was tricky. There is a lot of SW quilts out there. I finally settled on Jar Jar. Yeah, yeah, I know that a lot of the fandom hates him with a burning passion, but you can't deny that he is a major character and thus deserving of his own quilt block.
This is just my submission. You guys are gonna LOVE all the things the other designers have come up with. Stay tuned, it should be posted in the next week or so.
Wednesday, March 2, 2016
The Auryn
 |
| Tested by Angela G. |
A new quilt block from the FandomInStitches request page. The Auryn from Never-Ending Story. It's been a rather long time since I saw the movie, but the Auryn turned out awesome! Angela put the block together for me and I fixed some minor issues she had with lines not meeting up quite right. Overall this block as got me thinking about translating some Celtic Knots into quilt blocks. How cool would that be?
Monday, January 11, 2016
The Serenity Quilt Block
 |
| Photo used with permission from Helen C. |
A request came into Fandom In Stitches for the starship Serenity from the TV show Firefly. Well, as luck would have it, I already had that pattern made up and just needed to be tested! So here we have the firefly class ship "Serenity." The tester is thinking of adding embroidery to outline windows and panels which I whole-heartily encourage. I designed it as a silhouette in mind, but as a focus piece it probably needs the embroidery. Some flaws were found in the pattern, but hopefully I have fixed them and simplified the joins. Enjoy!
Wednesday, October 28, 2015
Blackhawks Logo Quilt Block
 |
| Photo by Dyana C. Photo used with permission. |
For anyone who is looking for a fandom related quilt block and just can't find it, this is the link for submitting requests to FandomInStitches.
Tuesday, October 27, 2015
Pokéball Quilt Block
 |
| Tested by Stephanie T. Photo used with permission |
Last week I decided to spend the day at the library. I like my library. The quiet peace of a hundred people working and learning. I find it soothing. So when I need a mini vacation I spend the day there. Good food in the cafe, free wifi, anything and everything I could ever want to look up, its all there. For some reason I wanted to see how fast I could make a quilt design. Beginning to end, finding the photo, designing it, writing up the cover page, all the way to compressing it all into a pdf. I looked at our spreadsheet that lists all the requests people have submitted to FandomInStitches and wanted to pick and easy block to do. The Pokéball from Pokémon seemed easy enough to do. So I timed myself. 43 minutes if your interested. Now that is not typical, this really was an easier one to do, but now I really have a urge to just go down the list of requests and do them all. There is like 300 requests so I don't think I can do em all. Maybe if I had internet at home I'd spend a few weeks knocking them off the list. For now I'll just putter around with them.
My tester said the ball didn't really want to get lined up nicely so I'm going back and seeing if there is anything I can do to make it easier to assemble, but until then its done.
Wednesday, October 21, 2015
World Of Warcraft Quilt: Tyrande Whisperwind

I have a very good friend that met about 8 years ago playing World Of Warcraft. We are still really good friends today. I decided I was gonna make him a quilt celebrating our time in WoW. I wasn't gonna post these blocks in case he saw them, but then he guessed what I was doing so it totally ruined the surprise. All well, now at least he can have some say in what blocks I do. The first block I've finished is Tyrande Whisperwind, the leader of the Night Elves in Darnassus. He picked the picture from one of the books. I just tried to mimic it.
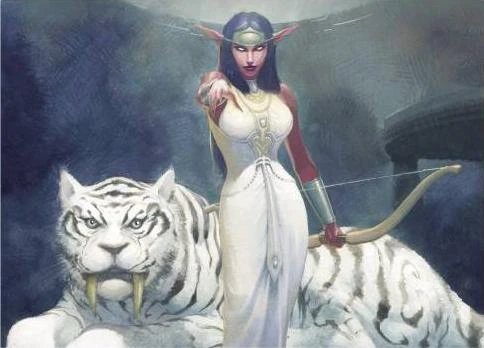
Having her one hand out and pointing didn't look right as a quilt block so I moved it behind her cat. I'm now trying to decide how much embroidery to do. I know I'll add the bowstring, but what about faces? I like her without, but the cat needs something. And if I do the cat I should do her too. Not sure. I'm still thinking about it.
Oh and here's a neat picture of the back before I tear the paper off. Maybe I'll do a tutorial of how to do paper piecing quilts, but until then I'll just refer you all to the tutorials on FandomInStitches.com

Saturday, October 10, 2015
Bunnicula

FandomInStitches is doing a special Halloween fandom post and they asked me to design a block for it. I had no idea what to do. I was thinking of a fav TV show, Rosanne, always had Halloween specials but what quilt block could represent that? Far as I know, Star Trek never had a Halloween special, I've already done a ton of Supernatural blocks, but maybe the scarecrow could have worked for that. Then for some reason I thought of the children's book Bunnicula that I loved as a kid. Bunnicula is a vampire rabbit that drains the juices from vegetables leaving them white, dry husks. Kinda cute and still fits the Halloween fandom theme, right? Well I hope you guys like it.
Here is Bunnicula before the embroidery:

And the cover I took inspiration from:

Monday, October 5, 2015
Supernatural Quilt: It's Done!
 |
| Yes, the Impala has wheels now. |
Finally! It's (mostly) done! And I posted it just in time for the #SupernaturalArtShow on Twitter yesterday. I'm still adding more actual quilting to it, but for all intents and purposes it is done. This is my first actually finished quilt. I've made a couple quilt tops in the past, but never got to the point of adding the batting and bottom layer and sewing it together. It sounds weird, but quilting is the most boring part of quilting. Quilters understand. The fun part is piecing the blocks and assembling the top.
Next up, a small throw pillow gift for a friend's birthday that I'm already late with and another themed quilt for another friend (World Of Warcraft this time).
Sunday, September 27, 2015
Supernatural Quilt: Assembling The Top

So I've been slacking off a bit on my quilt. I got all my squares done, I just hadn't assembled them yet. Then just yesterday I heard that some Supernatural fans are putting together an art showshow on Oct 3rd. Now I have a reason to finish it and a deadline to keep me focused. In one day I squared up my blocks, cut out sashing and corner squares, and assembled most of the top. It's starting to look more like a quilt! However the eagle eyed viewer will notice the Impala STILL doesn't have wheels. I know, I know, it's still on my to-do list. At this point I had to call it a day and go to work, but the plan for today is another row of sashing on the outer edge and another grey border to finish the top. Tomorrow I hope to pick up batting and sandwich the quilt. Following days will be for quilting. That will take the longest because I'm gonna do that by hand and that will NOT be my favorite part. Hopefully it will be presentable by the 3rd.
Check out the art show on Twitter on October 3rd. Follow the hashtag #SupernaturalArtShow for all the artists participating.
Wednesday, September 2, 2015
Guardians Of The Galaxy Quilt Block
 |
| Tested and photo by Elise C. |
My first Guardians of the Galaxy block! I'm not doing a quilt of this so I just designed the block and another woman tested it. She's making a Marvel based quilt for a friend and asked for an Awesome Mix Vol. 1 block. I'm glad it went together well for her :D
Friday, July 24, 2015
Supernatural Quilt: Anti-Possession Tattoo

Well, I finally got it done. The Anti Possession Tattoo was a pain in my neck the whole time, but Wow! I'm so glad it's done. The tattoo helps keep the boys from getting possessed by demons. Now, I am not an experienced quilter so my lines are not very straight and my corners don't match up the best, but a much more experienced quilter in my Facebook group tested this same pattern for me and hers looks fantastic!
 |
| By Linda E. Photo used with permission |
This is what it is supposed to look like when done professionally. Maybe I'll take a fabric marker to mine to hide some of the flaws. I'm so excited for this one. Most of my Supernatural patterns will be on FandomInStitches.com Thursdays starting the end of this month.
Saturday, July 18, 2015
Quilt Designer!

It's official, I am now an official quilt designer! My first block, Ruby's Knife has just been published over on FandomInStitches.com. I even got the designer badge to go on my blog. *giggle* The others should be posting over there in the next couple weeks or so.
In celebration I'll do a quick post on how I design my blocks. First and foremost I use QuiltAssistant software. It's free online, but I do highly recommend the tutorials on FIS. They will walk you thru step by step on how to use it. I was so confused by the software until I checked out the tutorials. Make no mistake, I am still learning, but this is where I started.
 |
| Kaylee's Umbrella pattern |
With the hard part done, next I make the instruction page. This is the page that tells you how to assemble the pieces into the block, shows what the finished block should look like, any embroidery that needs to be added, and any other information you may need. I design it all in MicrosoftPaint. I don't know if its free, but it came with my computer so I use it. Quick note: QuiltAssistant won't tell you how to assemble the pieces logically into a block. You just need to puzzle that out yourself (or maybe it does and I just don't know where to look for that yet. Like I said, I'm still learning).
 |
| Cover Page for Ruby's Knife |
Ok, this part that stumped me for a while. You now have a quilt pattern that is saved as a .qa2 file and a picture that is saved as a .jpg or .png file. How do you make it so people that don't have those same programs can open the files? Well, you convert it to a .pdf file. Most computers can open .pdf's. I use CutePDF to convert the various extenstions to .pdf's. CutePDF is a free software that you can also download online. One thing to mention tho, to use it, just act like your going to print your file. When the print dialog box comes up, just make sure to select the CutePDF printer. It doesn't actually print it, just converts it. Took me 3 days to figure out that one :P
Last little step is optional, but makes it easier for other people. You now have 2 .pdf's for your pattern. The pattern itself and the cover page you made for it. Now to combine the two of them so others only have to print off one link instead of two. PDFill can easily combine your .pdf's into one easy link. I just used the free PDFill tools, but there is more available on their website. Again, it's all free. I don't really bother with software I have to buy.
You now have one link with the quilt block you designed. You can give the link out to your friends in an attachment in an email if you like. I personally upload them to Google Drive so I can link them to my blog. It gives you guys an easy place to go to get the files. Just make sure your privacy setting is set so others can view the link. There you go! That is the current process I go thru to make my quilt blocks. Hope it encourages you all to try your hand at designing your own!
Subscribe to:
Posts (Atom)