Showing posts with label Work Friendly. Show all posts

Friday, April 17, 2020

Viral Masks

Right away I'm gonna apologize for the sloppiness of this post. The pictures are not color corrected, cropped or watermarked. The text will be fast and perhaps have errors. The reason for this is I have been asked to share how I make masks to help limit the spread of the COVID-19 virus and I slapped this post together fast. Maybe one day I'll come back and clean this up, but for now you have my apologies.


Directions

The CDC is now recommending face masks be worn:
 "in public settings where other social distancing measures are difficult to maintain (e.g., grocery stores and pharmacies), especially in areas of significant community-based transmission."

There are alot of mask tutorials going around out there. I'll admit, I hesitated a long time before jumping into the fray mostly because I wanted to find the right pattern. If I made masks to donate, I wanted to make sure they were useful. The tutorial I found was distrubuted by my local hospital on exactaly what they needed for home sewers. For a copy of the directions I used click HERE.  This is what I call fast and dirty stitching. I pin very little and I don't bother with pressing seams at all. I'm lucky my dad offered to iron the material I pulled out of the washer or I might not have even done that much. Speed and Quantity is what I'm after.


What you will need:

  • A sewing machine with thread
  • Prewashed 100% cotton material
  • 8"x14" piece of cardboard for a template
  • Scissors (Or rotary cutter and mat. I'm out of luck. Mine busted just before quarentine and I had to make due with regular scissors)
  • Pins
  • Tape Measure
  • Dinner Fork
  • Instructions
  • Something to make ties with (elastic if you can get it. I'm using cotton muslin cloth)


A 8x14 template will help speed you along if you are making many masks. I'm making them for all my co-workers so the template helped me A LOT. A pizza box lid was nearly the perfect size.


Fabric cut to size. This was just a regular quarter yard, not a fat quarter, so this is the only way the template will fit. If you don't want your design to be sideways like this one will be, turn it 90 degrees. You can almost get 3 masks from a quarter yard of fabric if one is a little smaller, but only 2 from a fat quarter, but you can twist it to make your pattern right side up.


Fold in half (WARNING! I took the picture wrong. It should be RIGHT SIDES TOGETHER! Not wrong sides as is pictured above. Sorry!)

Corrected Photo below. Right sides together.


I've been using a zig zag stitch. This is fast and dirty stitching and I wanted to make sure the stitches covered all the folds I would be sandwiching together. I also haven't been bothering with any backstitching till the very end. All these seams will be covered by another seam so I'm not worried.


Long side stitched up.


Turn it inside out now so the RIGHT SIDES are now facing out.


Slip the material thru the middle tine of the fork and twist the fork so the material twists into a fold.


Smooth the fold and slip the fork out. Each pleat should be about an inch big.


Pin the pleat in place and make one mor just below it. Pin new pleat and pin the folds flat on opposite end too.
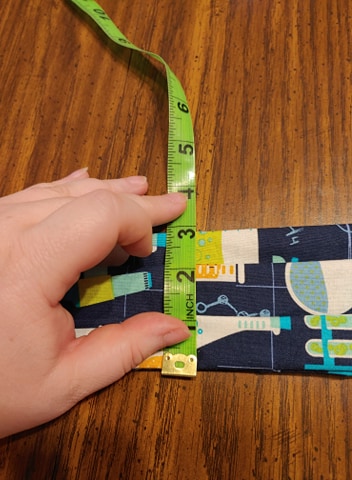

Face part of the mask should be between 3-3.5 inches wide. Too wide? Take the pleats in more. Too narrow? Pull the pleats farther apart.


Sew the ends and and pull the pins out. Trim up the excess fabric.


Cotton muslin has a wonderful feature. All you need to do is make a tiny cut the size you need. In this case my muslin is 36 inches wide and I made a tiny cut 2 inches in.


Take ahold of the fabric firmly on both sides of the cut and pull. Muslin tears in a straight line. You now have a 2 inch strip of fabric 36 inches long.


Fold the muslin in half and pin to your face mask.


Fold both raw edges of the strip to the center.


Then fold the strip in half so that the raw edges are INSIDE the tie. Before sewing it down, bend the tip up just a little bit to get the raw end sewn down too. I couldn't get a good pic of the starting fold, but 2 pictures down you can see the fold at the end. I also gave it a little backstitch.


When you get to the mask part make sure the raw ends are tucked inside and the strap is folded over the mask. You should be sewing thru ALL pieces of the mask. Your machine's feed dogs (the part that pulls the fabric thru the machine) might struggle a little thru this part so feel free to gently pull the finished strap on the other side to help the cloth get thru. Be careful not to pull hard or you might break your needle.


At the end of the strap, bend up the tip just like you did at the begining. You can also give a little backstitch on the bent up pieces if you so desire.


And here's your finished mask! It ties behind the neck and behind the head above the ears. Pull the face pleats open to cover your nose and chin.


Every instructional I write really should start with Step One: Remove cat from sewing table.


and Step 7: Remove OTHER cat from sewing table.


The Pennsylvania Department of Health has some good tips on using masks but I want to reiterate a few important ones:


  • Avoid touching the mask while using it, if you do wash your hands with soap and water or alcohol-based hand rub
  • Be discarded or washed after every use
  • Should not be worn damp or when wet from spit or mucus
  • To remove the mask: remove it from behind, do not touch the front of mask
  • The wearer should immediately wash their hands with soap and water for 20 seconds after removing the mask

Tuesday, November 12, 2013

Wicked Witches


I covered the costumes I made for my coworkers, but never showed off what I came up with for myself! I didn't sew anything for myself, most of my costume was stuff I already had. Every year I end up buying a witches hat because I've lost the one I bought the year before. This year was no exception. Somewhere in my house I must have a stash of 80 hats *sigh*. This year I was disappointed because the only hat I could find that had hair attached had purple streaks in the hair. I wanted all black. This turned out well though. The cape I have in my collection is black velvet on the outside but purple on the inside. It tied nicely with the hat. Then when I wanted striped socks I found some grey and purple ones. Purple turned into an nice accidental accent :D

My makeup was so much fun to do. A bright green base, I outlined wrinkles, lips and brows in black. My prosthetic nose had yellow highlights on it so I added yellow to cheekbones, forehead, and chin to match. I got some odd looks from passing cars for sure :)

Not only did I do my outfit as the Wicked Witch of the West, I also did the Wicked Witch of the East. She was easy enough, an extra pair of striped socks stuffed with some red sequined slippers we sell at the store. I just tucked the free end under the checkout counter. Looks like she got the table dropped on her.


And a shot of all of us together. I had no hand in the Tin Woodsman or Glenda the Good Witch but they did well by themselves. I loved doing this and hope next year we do something new. Maybe Disney Princesses. Something for an ensemble to do that is mostly women.


Wednesday, October 9, 2013

Wizard of Oz ~ Cowardly Lion


The Cowardly Lion. How do you do that without having to make a whole huge fursuit? Well this was very easy. I found an ear headband and tail at the dollar store and made the cuffs and collar. One sheet of craft fur was enough for both cuffs and the collar. The back of the craft fur is very scratchy so I lined it with craft felt. Cut the rectangle of fabric into 4 smaller rectangles. Sew both long sides to the felt leaving the short sides open to run a drawstring thru. I should have tacked the collar pieces together so it wouldn't gap apart, but I threw this together as an after thought. I was just going to use the ears and tail, but the cuffs and collar added so much more I'm glad I made them.


You can see the collar gapping open. It's cute and can work
but I still wish I had tried to tack it together.

Close up of the stitching and where the collar gaps open.

Felt sewn to the back of the cuffs and collar.

Stitching at the bottom and under the fur.

Backside of the collar. I used some yarn as the drawstring.
Have your model wear a brown shirt and pants. A little face paint for a nose and whiskers and you are done! One sheet of craft fur: 3 bucks. One sheet of felt: 25 cents. Ear headband 1 dollar. Tail: 1 dollar. Total: 5.25.

Tuesday, October 8, 2013

Wizard of Oz ~ Dorothy

This Dorothy costume is what got me making the outfits for the store. When we were thinking about dressing up, Dorothy was the one we thought for sure we'd have to buy and costumes at stores tend to be more expensive. No one wanted to spend much money on this, so I decided I'd try and make one. I bought a pattern for it but ended up never using it. It turned out more of an apron than a pinafore but still works well.

Me as the Witch and a Co-worker as Dorothy
I wish I had thought to take progress pictures so I could show you what I did to the fabric and the cuts I made. It is 2 yards of a blue and white gingham check.

Here is a pattern I whipped up to show you how I cut up the fabric.


Unfold your fabric. The majority is going to be skirt. A small square will be the bib front. The fabric to the side of the square will be your straps and drawstring. On the one that I made, I made the bib front too big and it tends to gap open at the top. Learn from my mistakes :)

You will hem the 2 sides and bottom of the skirt and the 2 sides and top of the bib. Aline the unhemmed edge of the bottom of the bib with the middle of the unhemmed edge of the top of the skirt right sides facing each other. Altho with Gingham there really isn't a wrong side, but if you are using different material then make sure your right sides are together. That sounded really confusing. Here is another picture of what I mean:


Now the next part isn't really tricky, but it is odd. You will fold down the top unhemmed skirt to make a big channel. This will make the waistband that the draw string will go thru. I did it with wrong sides together, but I regret that. You should do it with right sides together so that the channel for the waistband will be inside the pinafore, not outside where you can see it. This will require that you are careful with where the bib ends up. I accidently got the bib snarled up and had to rip the seam out because it sewed weird.


For the straps I simply sewed down one long side (Right sides together if you have a right side and wrong side) and turned them inside out so the sem was inside and it was a long tube. Press it flat and sew it to the corner of the bib. Bring it over your shoulder and pin it to the inside of the skirt. Repeat for the other shoulder. Run your drawstring thru the waist band channel and you are set to go. Tie the left over bits from the shoulder straps into bow in your hair and you are good to go! Here are some close ups of the finished apron on a manikin in our backroom. Sorry for the poor lighting and all the cardboard stacked up, we are getting ready for chirstmas and it was too cold for me to take pictures outside.

Front of the pinafore. You can see what I mean
about how I regret not making the waistband
 channel to the inside of the pinafore where you
wouldn't be able to see it. I also think I made
the bib too large.

Side and back view. The straps are pinned to
the inside of the skirt with safety pins.

Detail of the shoulder strap sewn onto the bib. I like to make
this cross pattern when sewing down straps. It makes me
think that it is stronger, tho I admit that the apron will
not be bearing much weight. And yes, I know there are
loose threads everywhere. I am a very sloppy sewer. Even
more so when I am under a deadline.

Have your model wear a white blouse and
since the skirt isn't sewn up the back she will
need to wear pants as well. Add props and
you are done!

Monday, October 7, 2013

Wizard of Oz ~ Scarecrow

Oh wow, this past week was a busy one. At work we decided that we were going to dress up for the release of our christmas ornaments as Wizard of Oz characters. I was so excited! We've always wanted to dress up for these events but never actually did it. As the only one who not only had a sewing machine but also wasn't afraid of it I decided I was going to help outfit some of the girls. I made costume pieces for Dorothy, Scarecrow, and the Cowardly Lion. I also assembled pieces for the Wicked Witch of the West. Today I'm going to show how easy and simple the Scarecrow is.

A co-worker models the Scarecrow outfit.
These costumes had to be very simple for a couple reasons. One was this was work and we couldn't be tripping over big or complex costumes. Two, I had very little time to prepare each outfit (Scarecrow took me about half an hour. Any more and I would have been late to work that day). And Three, they had to be made to fit several different people. Not only did I not know who was going to wear them this past weekend, but I don't know who will be wearing them in future years to come.


The capelet is simply half a yard of burlap folded, not in half, but unevenly so the top will be shorter than the bottom. Sew along the fold about an inch or more. This makes a nice channel for the drawstring to go thru. The burlap isn't the most comfortable material so the neck has to be wide enough so whoever is wearing it can make the hole big enough that it doesn't rub against skin.

In between the two layers of burlap I knotted lengths of Raffia and sewed it down so it looked like straw peeking out of the scarecrow's clothing.


Finally I made a drawstring out of more raffia (I'd never worked with it before and it was much stronger than I gave it credit for) and tied it in a bow in the front.


Instead of hemming edges I just pulled a handful of threads off the burlap and let the other ends free. The scarecrow is a raggedy character and it just added to his charm.


I seem to have forgotten to get a good picture of the hat but here is what I have. The hat was a store bought stiff felt like thing. I think it was originally for a Robin Hood costume, it had that shape to it. There was a red feather glued to the side but it peeled off easily. I couldn't get the line of hot glue to come off tho and tried my best to cover it with more raffia. I made a hat band of raffia and hand sewed it in places to get it to stay in place. The hat was very round and it kept wanting to slide off the top. I then folded some other lengths of raffia in half and sewed them inside the hat to either look like hair or like straw was falling out of it.

The straw "hair" tied inside the hat.


The raffia hat band sewn in place.


The line of glue where a red feather once was.


The whole ensemble on a manikin in our backroom. Sorry for the poor lighting and all the cardboard, we've been very busy getting ready for Christmas.


Have your model wear a green shirt and brown pants. Cover her nose with some brown face paint and there you have it. A very simple Wizard of Oz Scarecrow made in just under an hour and very work friendly. Cost of materials: Half a yard of Burlap: 2 bucks. Raffia: 3 bucks. Store bought hat: 5 bucks (Not purchased by me). Total for costume? 10 bucks. I was reimbursed for my materials.