
Directions
The CDC is now recommending face masks be worn:
"in public settings where other social distancing measures are difficult to maintain (e.g., grocery stores and pharmacies), especially in areas of significant community-based transmission."
There are alot of mask tutorials going around out there. I'll admit, I hesitated a long time before jumping into the fray mostly because I wanted to find the right pattern. If I made masks to donate, I wanted to make sure they were useful. The tutorial I found was distrubuted by my local hospital on exactaly what they needed for home sewers. For a copy of the directions I used click HERE. This is what I call fast and dirty stitching. I pin very little and I don't bother with pressing seams at all. I'm lucky my dad offered to iron the material I pulled out of the washer or I might not have even done that much. Speed and Quantity is what I'm after.

What you will need:
- A sewing machine with thread
- Prewashed 100% cotton material
- 8"x14" piece of cardboard for a template
- Scissors (Or rotary cutter and mat. I'm out of luck. Mine busted just before quarentine and I had to make due with regular scissors)
- Pins
- Tape Measure
- Dinner Fork
- Instructions
- Something to make ties with (elastic if you can get it. I'm using cotton muslin cloth)

A 8x14 template will help speed you along if you are making many masks. I'm making them for all my co-workers so the template helped me A LOT. A pizza box lid was nearly the perfect size.

Fabric cut to size. This was just a regular quarter yard, not a fat quarter, so this is the only way the template will fit. If you don't want your design to be sideways like this one will be, turn it 90 degrees. You can almost get 3 masks from a quarter yard of fabric if one is a little smaller, but only 2 from a fat quarter, but you can twist it to make your pattern right side up.

Fold in half (WARNING! I took the picture wrong. It should be RIGHT SIDES TOGETHER! Not wrong sides as is pictured above. Sorry!)
Corrected Photo below. Right sides together.


I've been using a zig zag stitch. This is fast and dirty stitching and I wanted to make sure the stitches covered all the folds I would be sandwiching together. I also haven't been bothering with any backstitching till the very end. All these seams will be covered by another seam so I'm not worried.

Long side stitched up.

Turn it inside out now so the RIGHT SIDES are now facing out.

Slip the material thru the middle tine of the fork and twist the fork so the material twists into a fold.

Smooth the fold and slip the fork out. Each pleat should be about an inch big.

Pin the pleat in place and make one mor just below it. Pin new pleat and pin the folds flat on opposite end too.
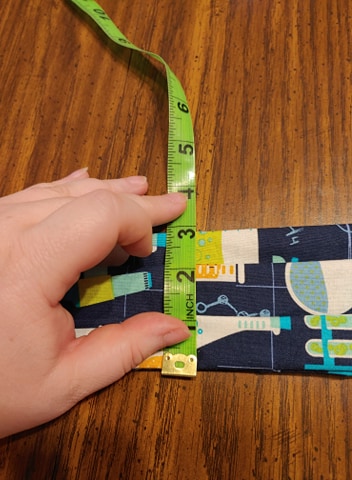
Face part of the mask should be between 3-3.5 inches wide. Too wide? Take the pleats in more. Too narrow? Pull the pleats farther apart.

Sew the ends and and pull the pins out. Trim up the excess fabric.

Cotton muslin has a wonderful feature. All you need to do is make a tiny cut the size you need. In this case my muslin is 36 inches wide and I made a tiny cut 2 inches in.

Take ahold of the fabric firmly on both sides of the cut and pull. Muslin tears in a straight line. You now have a 2 inch strip of fabric 36 inches long.

Fold the muslin in half and pin to your face mask.

Fold both raw edges of the strip to the center.

Then fold the strip in half so that the raw edges are INSIDE the tie. Before sewing it down, bend the tip up just a little bit to get the raw end sewn down too. I couldn't get a good pic of the starting fold, but 2 pictures down you can see the fold at the end. I also gave it a little backstitch.

When you get to the mask part make sure the raw ends are tucked inside and the strap is folded over the mask. You should be sewing thru ALL pieces of the mask. Your machine's feed dogs (the part that pulls the fabric thru the machine) might struggle a little thru this part so feel free to gently pull the finished strap on the other side to help the cloth get thru. Be careful not to pull hard or you might break your needle.

At the end of the strap, bend up the tip just like you did at the begining. You can also give a little backstitch on the bent up pieces if you so desire.

And here's your finished mask! It ties behind the neck and behind the head above the ears. Pull the face pleats open to cover your nose and chin.

Every instructional I write really should start with Step One: Remove cat from sewing table.

and Step 7: Remove OTHER cat from sewing table.

The Pennsylvania Department of Health has some good tips on using masks but I want to reiterate a few important ones:
- Avoid touching the mask while using it, if you do wash your hands with soap and water or alcohol-based hand rub
- Be discarded or washed after every use
- Should not be worn damp or when wet from spit or mucus
- To remove the mask: remove it from behind, do not touch the front of mask
- The wearer should immediately wash their hands with soap and water for 20 seconds after removing the mask
No comments:
Post a Comment